Cambria’s 20 year refit

NB: further photos of the refit are located under refit in the “photo” section of the website.
The aim of this refit was: to treat corroded steel along the forefoot and stern post; draw and inspect a number of random keel bolts; remove and inspect the rudder, steering gear, bowsprit and head gear; and inspect the stainless steel fastenings.
We set the rule of replacing: steel work corroded greater than 20% of original thickness and all high moisture planks showing signs of degraded structure. These guidelines are used by Lloyds, who originally set the scantlings for Cambria back in 1927/8.
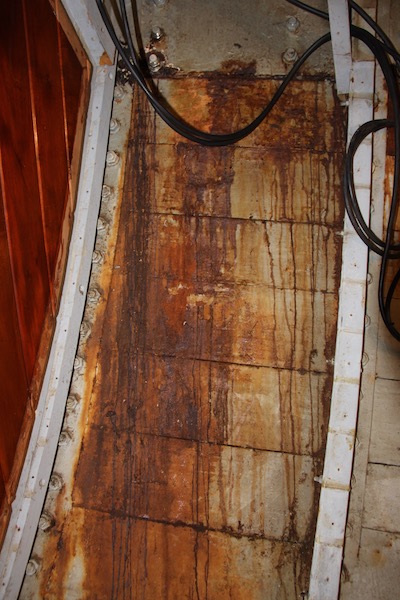
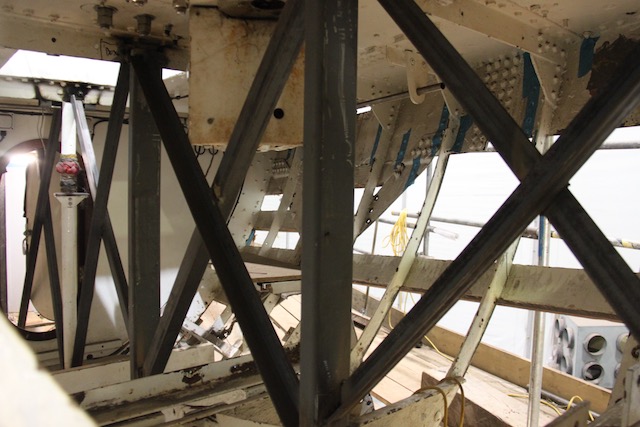
Whilst waiting for the Ably shed to finish with the current project, we started dismantling the crew mess and packing up all items on board. During the week prior to pulling the mast, we secured and started to fill a storage facility (a handy shed). Removing the slats from the crew mess showed signs of the water ingress about the sheer plate but also showed the planking in reasonable condition. This region of Cambria had not been accessed for considerable time and so was a relative unknown. The steel work below this region was heavily corroded which had led to the assumption of where the water had come from to cause the corrosion. Originally we had thought the water had come from the fore peak, hatch ways, chain pipe and anchor well, however this showed ingress from behind the shear plate which infers to leaking from the deck joint and the whisker stay through fitting. Something to investigate further with the sheathing removed.
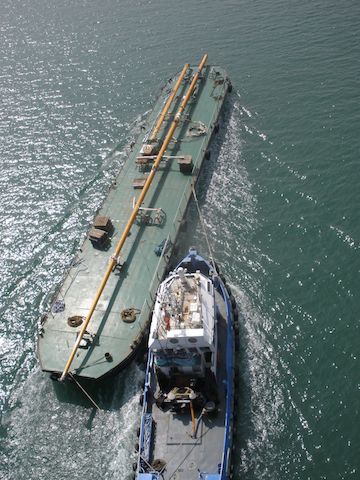
Ten days after arriving, the mast and boom were unstepped and Cambria moved from Ocean Village upstream under the Itchen Bridge to Saxon wharf and SYS’ Ably shed. Again we used Blade Runner for cranes and barge to lift the mast and boom off Cambria then transport up to SYS. We used old friends Spencer’s rigging for the lift.
The bowsprit had not been shipped since 1995 and was a challenge as none of us knew how to remove it intact or if in fact it was possible Before entering the shed with the bowsprit still relatively close to the ground we started investigating and found the cap rail had been epoxied onto the sprit and the heel fittings bolts buried under teak decking. Furthermore, the gammon iron fastenings were set behind the bow fairlead hawse pipes port and starboard. This meant we would have to leave sprit removal until we were inside the shed. The Oyster 'Penelope'’s refit was complete and Cambria could now move in.
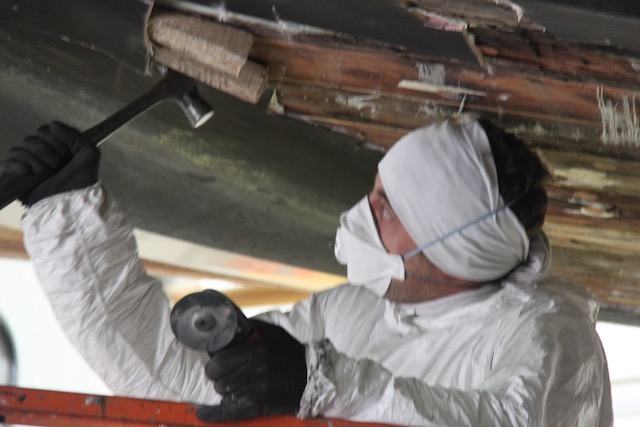
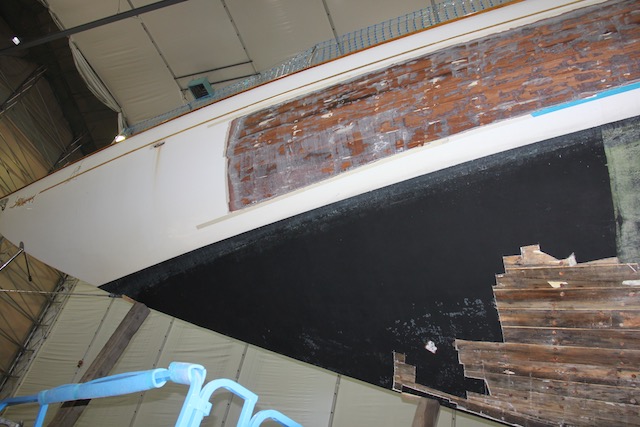
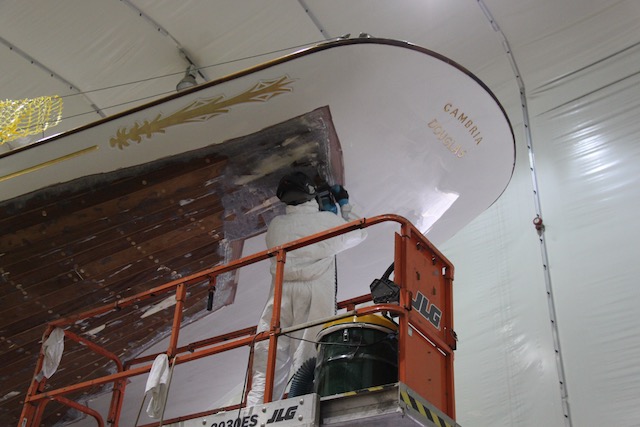
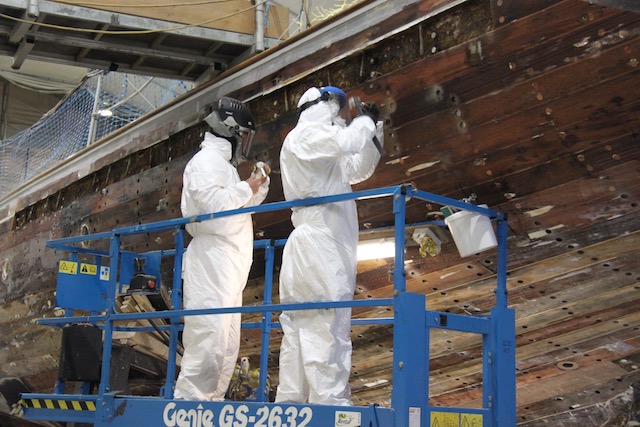
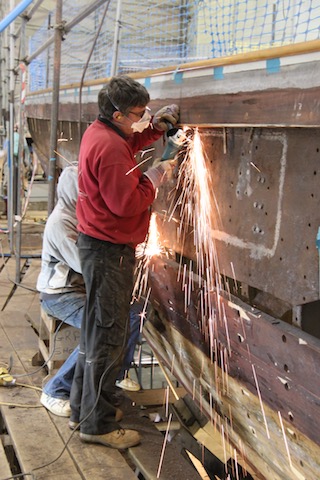
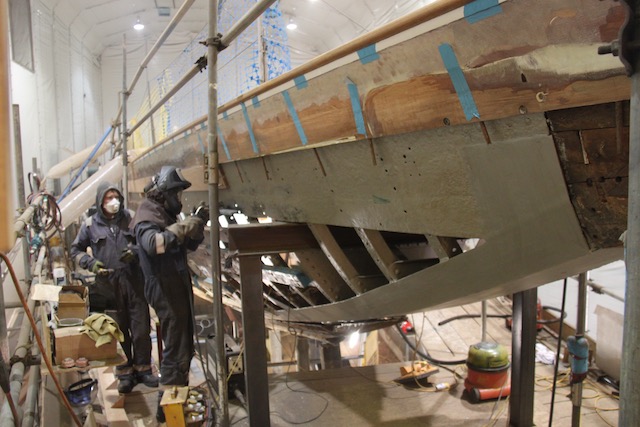
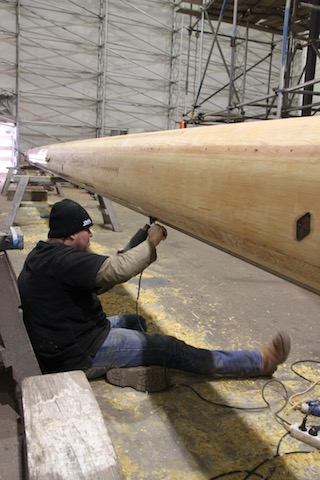
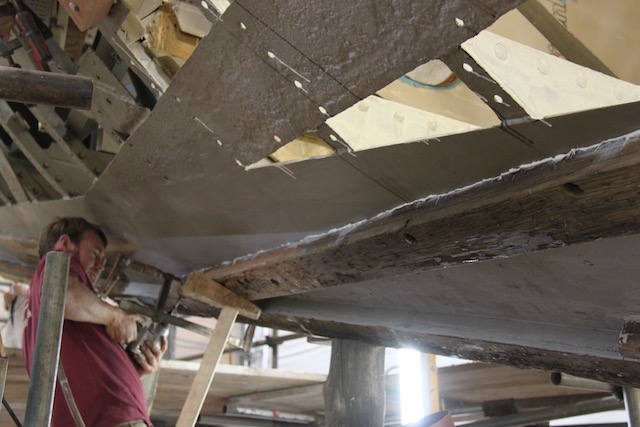
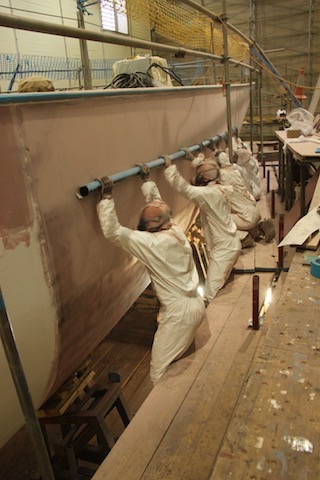
Once we got Cambria into the Ably Shed at SYS the priority was to get the glass sheathing off her hull to allow her to dry out and inspect what lay beneath. We started this operation using scissor lifts for access around the hull rather than having to reset the scaffold staging. We found cutting the glass with oscillators then using wooden wedges the best method for glass removal below water line whilst above water line, particularly due to the awl grip paint and the fact the glass was ‘firmly’ fixed to the mahogany, the team from Centerline used Gel peelers. These are essentially modified electric planers, which can operate on curved surface. The aim was to only remove the glass and not damage the wood below too much as this would lead to more fairing later and result in further loss of plank thickness. For the following 3.5 weeks there was a steady screaming noise emanating from the shed as 4 guys ground off 130 square meters of Cambria topsides.
Whilst the Gel planers worked outside, a myriad of other jobs commenced.
The bowsprit came off after exposing all heel fastenings. We then accessed the gammon iron fastenings by removing the fairleads and cutting through the cap rail. With the bowsprit off we could investigate two areas unseen for 20 years, the beak and the bowsprit itself. The bowsprit has two very substantial fittings covering the ends. We needed to check where the timbers end grain was potentially exposed: the heel fitting on the inboard end and the cranse iron on the outboard end. Immediate visual inspection showed the heel end in excellent condition however the cranse iron end had tell tale signs of blackened wood and as a result needed to be removed for further works.
The engineering systems were being removed to allow access to the inside of the hull for the fastening works. Thus all electrics were disconnected and removed. The battery banks were craned off and stored, on charge, at the head of the shed, collectively over a ton of weight. The plumbing was disconnected and removed to allow the tanks (three fuel, one water and one grey/black tank) to be taken out. Whilst the tanks were being removed the interior was dismantled, carefully labelled and taken to our handy shed for storage. This included: crew mess and head, galley, saloon, nav station, captains cabin, port and starboard guest cabin, starboard guest head, master cabin and ensuite, and lazerette. A daunting task, however within 4 weeks from landing in the Ably shed everything was out and stored.
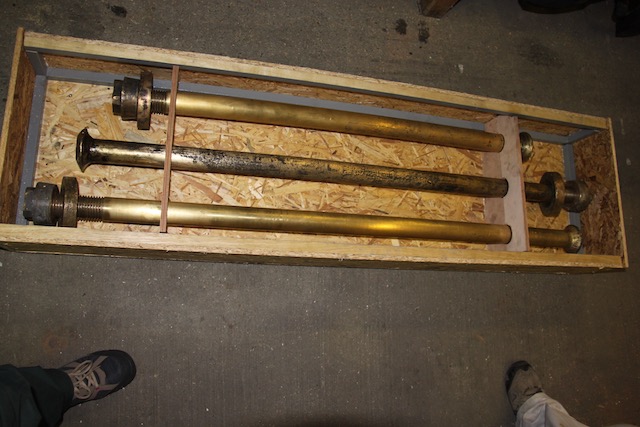
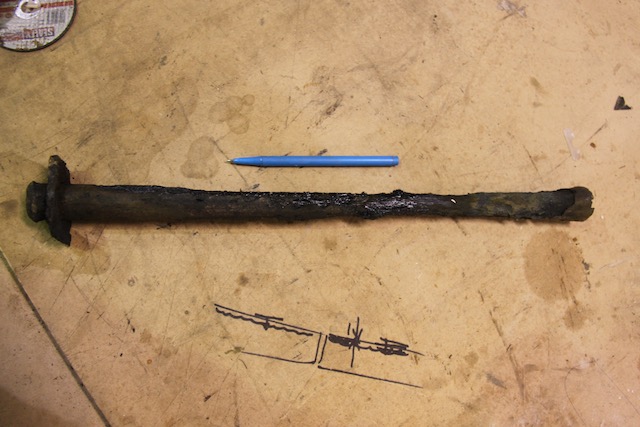
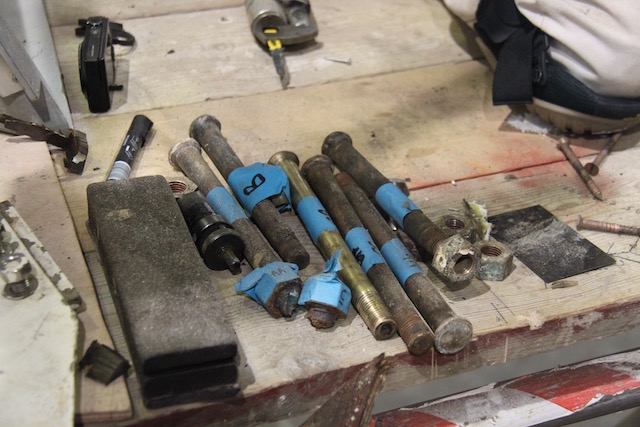
By this stage; early October, 3 keel bolts had also been drawn and sent off for x-raying. Removing and testing the keel bolts had to be well organized as keel blocks had to be moved to access the bolts, so once bolts had been out and tested, they were replaced and reblocked as soon as possible to reduce the risk of keel movement and allow the next bolt to be removed and inspected. Removing the keel bolts firstly required locating and removing the nuts then jacking the bolt back up into the bilge. The bolts are 2 inch (50mm) diameter and 4 foot long (1200mm) with domed heads and washers with a tapered washer/nut.
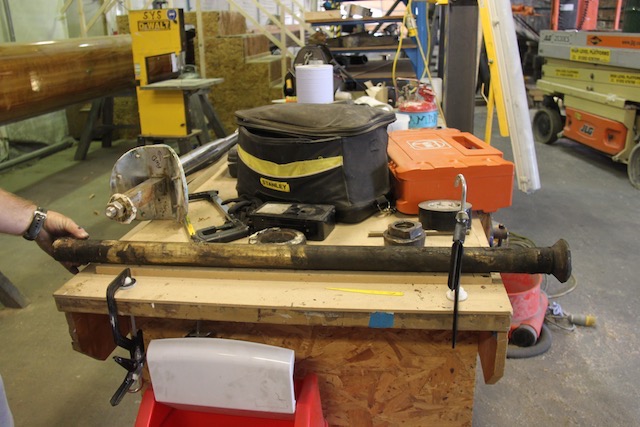
They are the original design and it is not known if they are the original bolts, however they were all in excellent condition and were reinstated. In all, 7 out of 17 were drawn, tested and put back in. The keel bolts were pressed out using 8 ton jacks. The testing was carried out by a company called Ultramag, who specialize in non-destructive testing (NDT) via xray. They also carried out the NDT on all of Cambria’s rigging in particular rod ends.
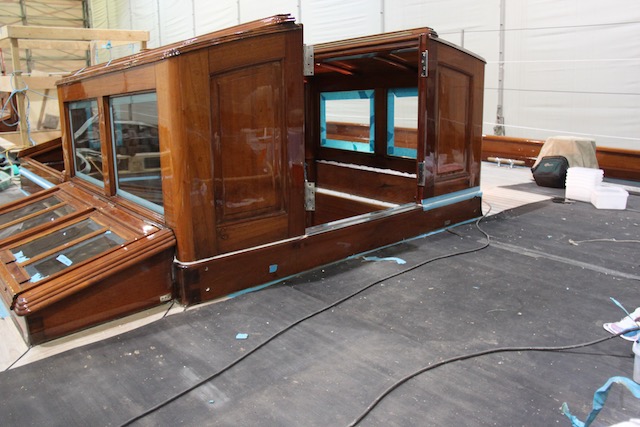
Dave, Anna, Colin and Laura turned the handy shed into what became well known as the 'Strip Club'. Not only was it our storage area, but it was also our workshop and varnish shed. All deck furniture was taken off; all hatches, sky lights, lockers and the dog house itself. These were then stripped back to bare timber, minor repairs made, sanded ready to be re-varnished. Hence the naming of the ‘strip club’!
A program was drawn up and then the task of “stripping” commenced. After trying numerous methods, the guys settled on using; paint stripper, scrapers followed by sanding, brass wire brushes, steel wool and scouring pads for the mouldings and tricky to get to places. Long days of BBC Radio 2 Pop Master, Bluegrass sessions and talk back radio (Jeremy Vine!) ensued for the next 3 months as the mahogany was brought back to original deep red colour. The program included stripping, sanding, repairs where required (including major works to the main dog house and crew hatches to reduce water ingress) sealing coats, 8 coats of wood finish as build up followed by 2 coats minimum for top coats. Using the wood finish saved time and work by hot coating 4 coats at a time. It was an unknown to see what the final colour of the beautiful Brazillian mahogany would be. On each visit to the shed it was exciting to see the wood coming back to life after many years of sun bleach.

By early October we had two distinct areas of work, the Ably shed with Cambria’s hull works and the strip club with the interior and deck furniture works. We would all meet at lunch and then return to each other’s place of work. Tash kept everyone’s spirits high with fantastic food she’d prepare each morning and then ferry in for us, no one went hungry.
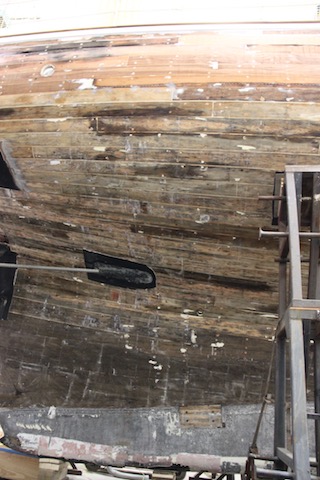
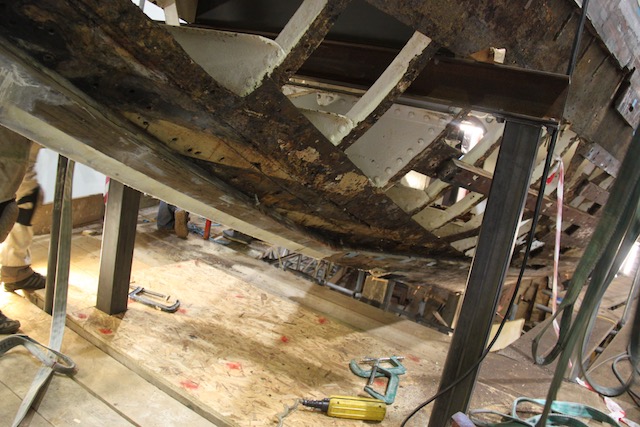
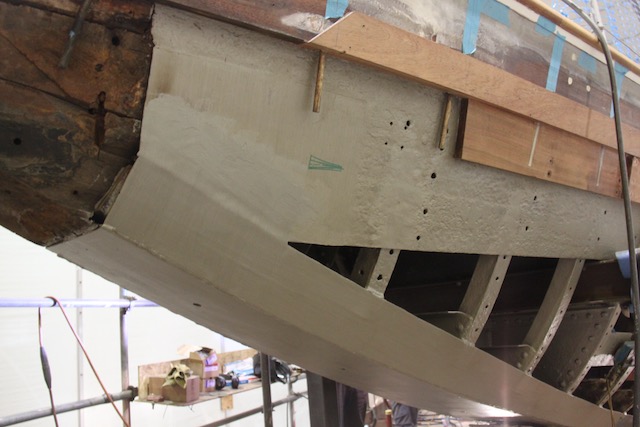
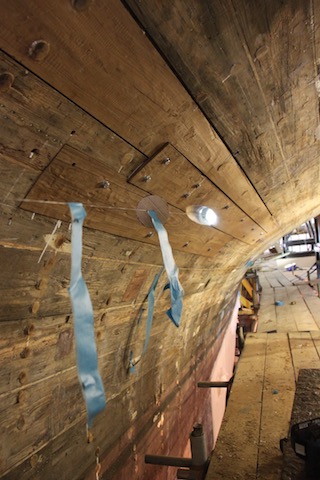
The weather was holding in well for England and Cambria was drying out well. Once the glass was off, initial surveying of the hull planking was positive. The most impressive and encouraging sight for the project was the condition of the teak backbone. The stem, forefoot, timber keel, sternpost and horn timber looked remarkable.
The joint between sternpost wooden keel, the lowest point for water to collect under the fibre glass and potentially a major game changer, was for an 86 year old, dry. This was a massive relief, though we had allowed for all eventualities; even securing a log of Doussie in case we needed to make repairs along Cambria’s backbone. She was sound. We did not need to remove the keel and we could concentrate on the known issues.
As the glass was now off, Cambria was drying out. In fact after the first three weeks of drying we noticed parts of Cambria drying out at different rates. The mahogany topsides were the concern as splines started to split. To slow the process we coated the mahogany with Eposeal 300, from Gurit (special thanks to Martin Armstrong and Rudy). The team from Centerline (Mike Moody, Pete Robertson, John Garret, Jamie and Alex) moved on to removing all fastening dowels (plugs).
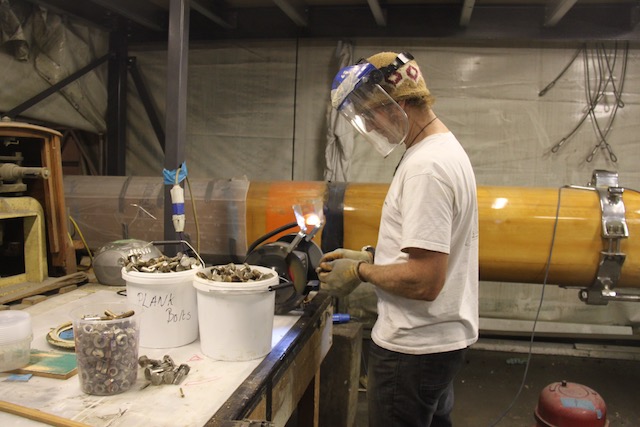
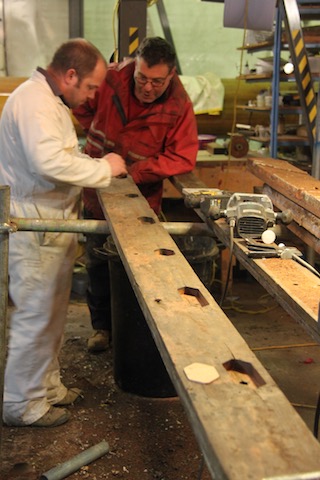
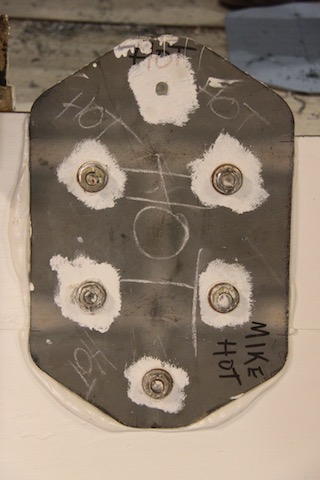
One of the aims of the refit was to insulate all the stainless steel fastenings. The bolts were also an unknown, as literature suggests, a high risk of crevice corrosion, plus the more obvious issue of dissimilar metals; stainless steel in contact with the mild steel frames. If we found a significant issue with the crevice corrosion we had budgeted in changing out over 5000 fastening to bronze. Upon removing the first obviously water damaged plank, (at the stern about the skin fitting for the cockpit drain), we had a reasonable selection of stainless fastenings. Once cleaned up they were all found to be in good to excellent condition. This was positive. Still not a significant number, we set to work removing fastenings and cleaning them up. The first part of this job is to remove all the dowels covering the heads of the bolts. Initially we set out to do this job frame by frame; in fact frame miss two frames frame so not to spring the planks off the frames. We soon had buckets of fastenings for cleaning and inspection. Each stainless fastening was from the 1995 refit and had been custom made with shallow heads to reduce wall thickness removal for dowelling. To deal with the dissimilar metals we ordered 5000 tufnol washers. Nylon could be used but tufnol was picked for greater compression strength. After cleaning up over 500 bolts we decided to stay with the stainless fastenings. In general the A4 grade fastenings had not suffered greatly, with the exception of fastening surrounded by wet rotten wood. Such an environment is not recommended for any fastening! Any bolt showing even the smallest sign of corrosion was discarded and replaced with another A4 stainless bolt. All old bolts were polished up and a thread dye run over them to ensure they would not bind up.
Barry Argent, the lead shipwright from SYS, started removing the teak stem in order to expose the steel keel plate underneath which was the concern.
With the bowsprit off, three large stem deck fastenings were exposed. These were what seemed original mild steel upset headed through bolts which tied the stem through the beak deadwood to the deck steel plating. The remainder of the stem was through bolted with bronze into the keel plate. Further tying it together were plank bolts set on the angle up through the apron of the stem and through the keel plate. The bow planks would therefore need to be released to remove the stem. This meant 17 planks either side. Of these planks a number were condemned, the rest would be repaired, re-edged and reused.
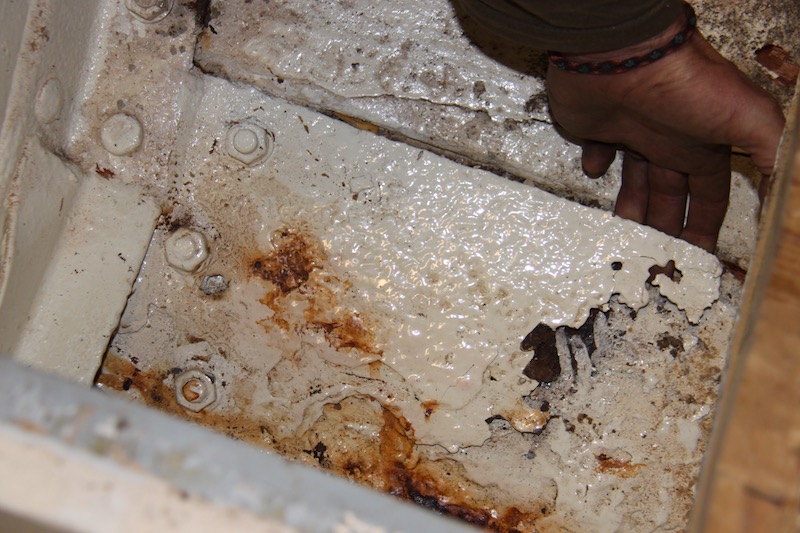
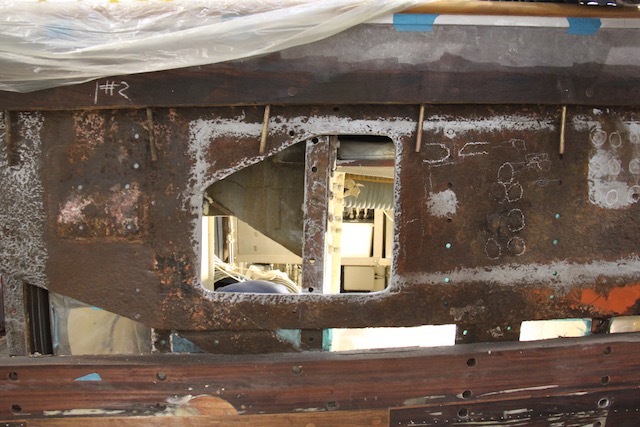
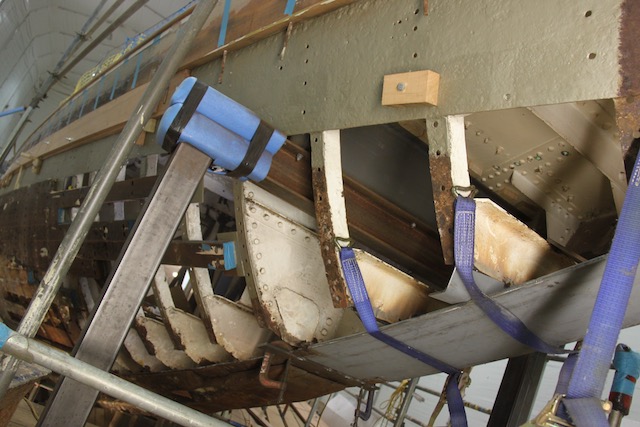
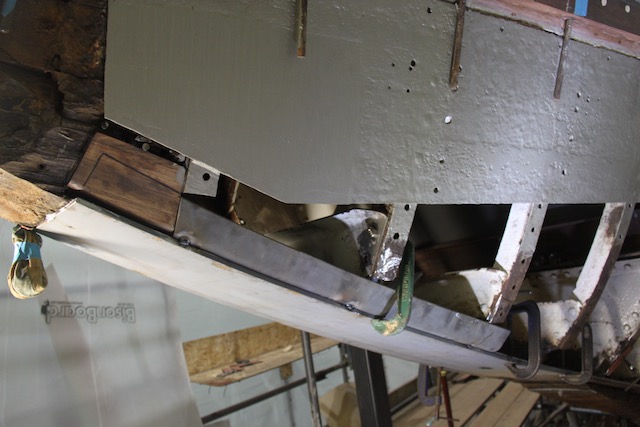
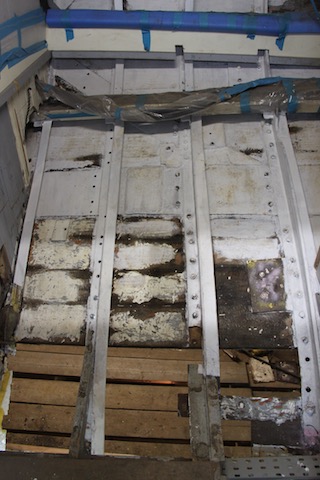
At the same time the worst of the planks about the transom and the port side sheer line were removed. This uncovered the largest extra work of the refit. From initial inspections the steel sheer plate from the interior looked in good condition, what we found in four specific areas around the sheerline were deformed and discoloured planks. With these planks removed we found the cause: Backing plates had been installed about the chain plate areas when Cambria was converted into a ketch in the early 1970’s. These backing plates had moisture trapped between them and the original sheer plate, creating the perfect environment for rust formation. By the time we’d uncovered it there was 25 mm of rust pushing against the planking. Once the planks had been removed we could cut away what was left of the backing plates to expose the original steel work. After anxious moments we found the original sheer plate in excellent condition, well within the criteria we had set. With this now established we could plan the remedy for the sheer plate.
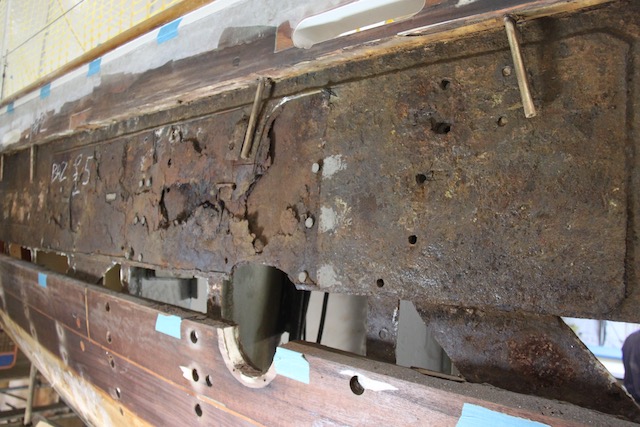

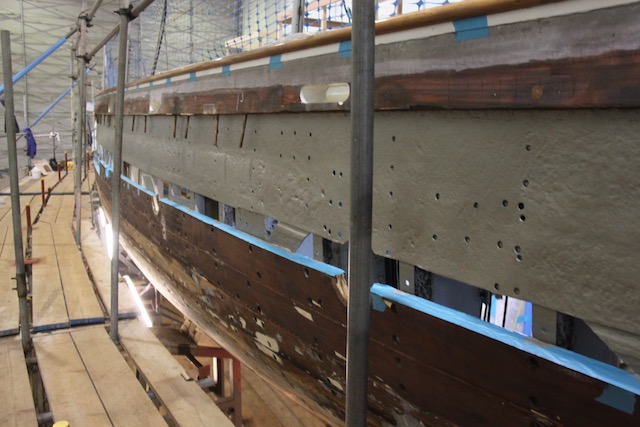
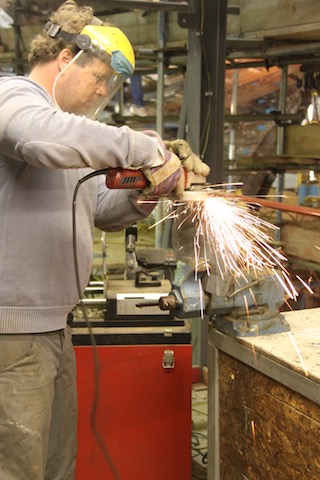
Around the bow we uncovered by way of the whisker stays further degradation so we had to treat the entire sheer plate, this plate is 70m long, including port and starboard. There are actually 3 strakes running the length of Cambria which cover the steel sheer plate. The bulwarks and capping rail, which were in excellent condition, are tied into strake # 1, with dovetailed bronze dumps. The task was then to treat the steel sheer plate, refit strakes 1,2,3 and re connect the bulwarks to strake 1. Firstly all the rust was removed by needle gun, grinding and wire wheel. Where needed, any wasted steel was replaced by welding in new sections. The steel was then treated with Intershield 300 epoxy paint. With the steel work completed the strakes could be reinstated.
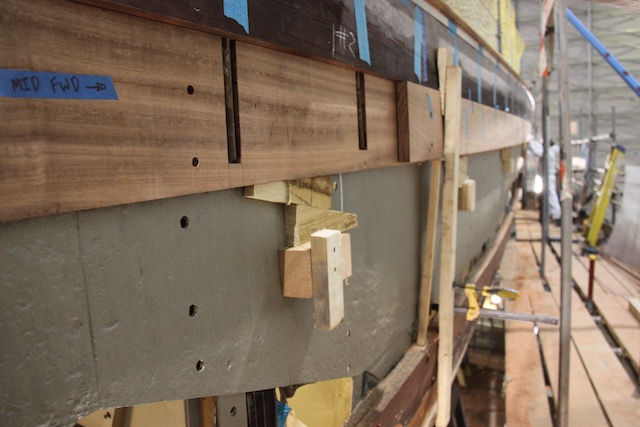
Strake one was put in in two separate pieces, the first fitting up behind the dumps, the second laminated over the top of the dumps then through fastened into the sheer plate. This method, a mix of traditional and more modern techniques retained the original bronze dumps and the full integrity of the bulwarks. Strakes two and three could then be fitted below.
As this remedial work had not been originally planned we needed to source more Mahogany for replacing strakes 1 and 2. By this stage we could estimate our Mahogany requirements for the repairs to be made.
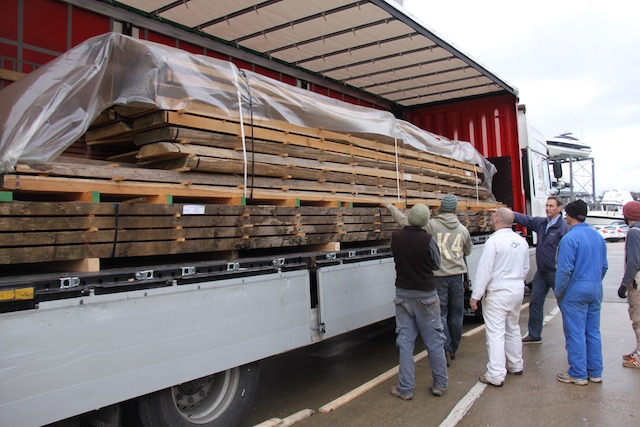
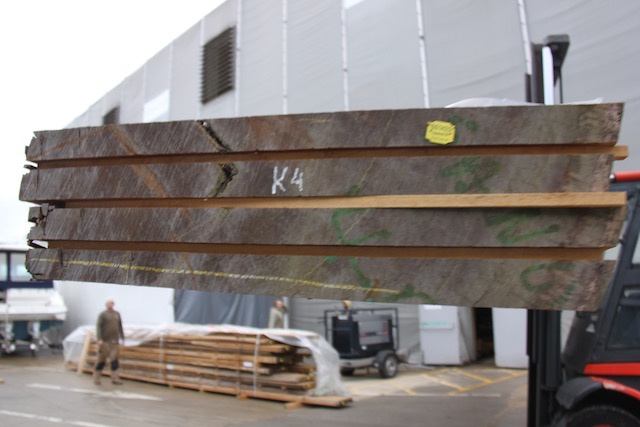
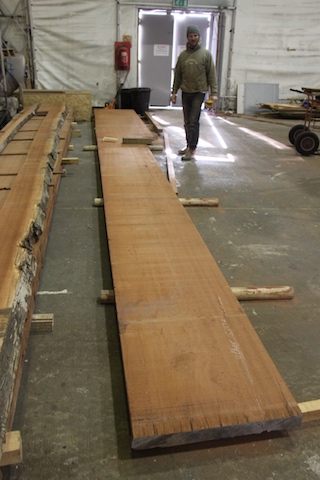
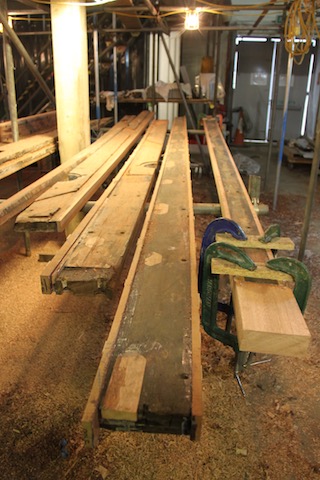
Our longtime friend John Lammerts Van Beuren and his company Touchwoods BV, who helps source and supply all of Cambria’s timber requirements, came up with the lengths of clean, dry sipo. John has been involved with Cambria since the building the mast back in 2006. With his help and expertise we had planned all the timber needs for the project. This had taken a number of years to find the right stock of not only timbers such as Mahogany and Doussie but also the teak, which again through John’s help we sourced via Boogaerdt’s in Holland. The teak, 23 live edge boards between 7 and 9 meters long and 80mm thick, had originally been purchased with the deck in mind but also as a supply for requirements below water line should the need arise. In reserve to this lumber supply were another 4 boards of Mahogany, which had been donated from another Classic yacht project underway in Holland. These boards were immense: 9 meters long x 1.2 meters wide x 65mm thick, and required 12 of us to lift each one! The teak and the 4 large boards were transported to SYS for mid December where they were placed on sticks to dry down the last few percent before use. The topside mahogany arrived mid November ready for immediate use. John requires special mention here as his support and knowledge is greatly appreciated as is his relentless energy. He is one of the true gentlemen in the world of classic yachts.
By early November, the project was progressing well. Though the task was immense, it was being tackled on many fronts. The only sticking point was the steel work. A number of companies had been approached, however, many seemed to be shying away from perhaps the more difficult details of the spec., which, in many places required for the hot works to take place with the timber planking in tact! Where access could be provided to the steel from both sides it would be however there are many places on the hull where this access was not available and would require a careful and skillful welder. The other difficulty was how to manufacture the keel plate/vertical keel plate angle. This length of angle steel joins the keel plate to vertical keel plate, originally by riveting. This piece has a slight change in bevel angle as it moves forward/aft over the frames along the centerline. We had initially hoped this piece could be manufactured by rolling however with change in bevel this proved inefficient and after a number of attempts we changed to manufacturing in-situ by welding. After struggling with this process through December, we found a fantastic team of welders within Burgess marine who in January started to find their rhythm.
Whilst Barry and Jim removed the stem to access the steel work inside, the welders made repairs to the sheer plate, cutting out wasted area and making good and also filling old chain plate fastenings no longer required.
Before the timber stem could be removed it was necessary to support the bow more substantially. By removing the planking at the bow and then the timber stem and the steel longitudinal, the remainder of the bow would only be supported by the deck tying the frames together. The potential for deformation was obvious, so Barry and his team built steel legs (the “goal posts”), which provided direct support from the deck to the floor of the shed. A series of angle supports were then welded along the centerline through the forepeak to provide further rigidity.
With this all in place, on the 17th of November, the teak stem was carefully removed and lifted clear of the bow. It was found to be in excellent condition and over the following weeks was cleaned up, small repairs made, then stored until ready to be reinstated. The bow was now clear for the steel workers.
The planks, which had been removed, were now either repaired or replaced.
To remove the stem, a number of large through fasteners had to be removed. The fastenings of the stem to keel plate were all bronze bolts and in excellent condition, the longer through fasteners from stem to deck were however steel, these three upset head fastenings were heavily corroded and in need of replacement. A strange choice of fastening for this area, though they had easily achieved their spec of 18 years, we replaced them with bronze fastenings of the same scantlings.
The keel plate was quickly cut away and removed. This was the easiest part to remove, as it was a direct replacement. The keel plate, angle and the vertical keel plate were all being replaced in this section. As we progressed aft towards the mast, only small sections needed replacing. This meant grinding heads off rivets to carefully remove offending pieces whilst not disturbing the other original pieces still in excellent condition. Test welds were carried out to ensure the new Lloyds grade steel would bond well to the original steelplate. This attitude was adopted frequently. In fact to answer any questions, which were not in the boat-building manual, we carried out tests.
• Another example of this was the question of how well would the epoxy hold when scarfing teak to pitch pine. We simply glued an off cut of teak to a condemned pitch pine plank. For extra effect we immersed it in the Itchen River for 5 months. When we eventually took it out and tried to separate the joint will found the timber split before the glue line failing.
The new keel plate was offered up in-situ early December and clamped into position before tack welding in place. Its shape and positioning is critical because the angle and vertical plates attach to it. The stem and planking then bolts to this structure. If the shape or placement is incorrect it snowballs with each layer. This was the easiest of the steel components in this section, as it only required shaping in one plane, the angle requires shaping in three planes. This was achieved by heat and a series of cuts on the compression side of the bend.
December also saw the rod rigging go off for testing at Ultramag. Special thanks to Harry from ‘The Rig Shop’ for lending us his trailer to transport the rigging across Southampton to Marchwood. Logistical challenges such as moving 12m lengths of rod rigging and stays coiled in 4m diameters often arise in this world and without help from friends the challenges soon become expensive headaches. At Ultramag the rigging terminals were x-rayed and any sign of stress was flagged for assessment. Fortunately, all the terminals proved to be in excellent condition, with the exception of the bobstay, which had a cracked stem ball on the inboard end. Though the crack was likely to have been caused in the pressing process a long time ago, we had the additional length to press in a new end with thanks to the team from Ocean Yacht Systems. To release the bobstay requires upsetting the watertight integrity of the hull and therefore not a regular routine maintenance item.
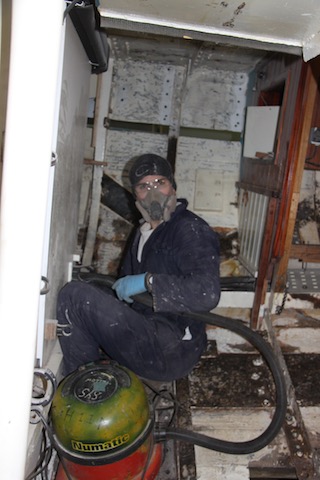
Projects always suffer around holiday periods, particularly Christmas. With this in mind and with the need to continue the momentum, the crew continued with all the tasks required to keep the rest of the trades fed on their return to the shed. Jobs such us preparing surfaces (needle guns, grinding, wire wheeling steel work), sanding and priming interior planking not being removed, cleaning pipework, wire wheeling bolts and servicing engineering systems. The preparation work that precedes the fitting of new works is massive and time consuming. With many of the team away during this two-week period it gave the crew a clear run to get ahead with these jobs.
Everyone was back in the shed by the 5th of January and with welders John, Dave and Bob joining the team from Burgess a particularly positive wave swept through. A different approach to the keel angle had immediate results with the first 2-meter section offered up and tacked in position two days later.
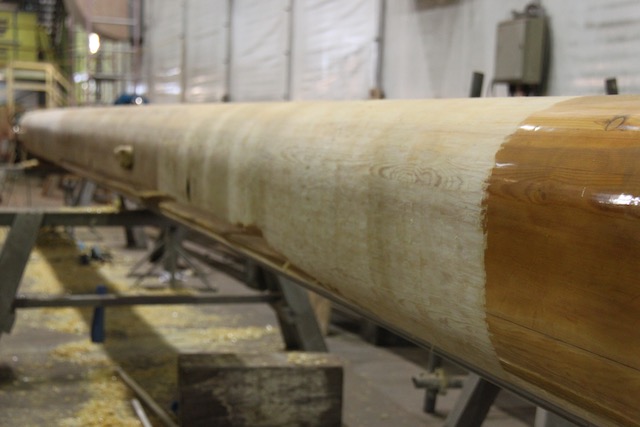
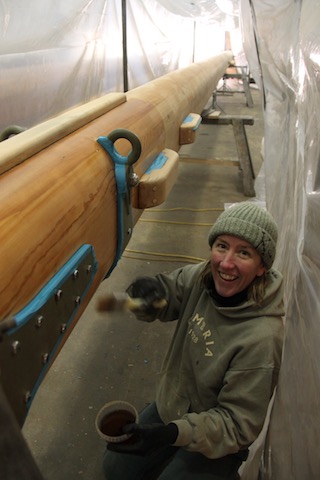
Cambria’s mast and boom were lying next to her hull and would also receive attention. The mast was last out during the 08/09 refit, and it is prudent to have a wooden mast out for inspection every five years. Firstly, all of the fittings including spreader ends were removed and red lead paint was reapplied where necessary. The fittings were then beaded down with white lead putty. The same process we had used when we built the mast in 06 which had protected the timber perfectly. In January the stripping and sanding started. The boom, which is varnished, was first then the mast, which is oiled. We needed to leave the oiling process until the temperature started to climb. Once the boom was stripped and sanded a tent was built over the 18m long spar ready for varnishing. Remembering the works going on next to and above - the tent was vital! The varnishing regime was as follows: sand down to 220 grit; then a 50/50 coat was applied to seal the timber, eight coats of wood finish was then applied (which reduces the sanding between coats) for build up, two topcoats of single part Epifanes then finished off the job. All varnish work followed this regime so we could keep track of the finished colour.
Keeping the temperature up to workable levels was vital not only for the comfort of the work force but also for products such as paint and glue to work. The ambient air temperature is one thing but the temperature of the materials, ie all the steel work on board, is another matter. Using two very large heating units and 100’s of meters of ducting to direct the heated air around Cambria and the shed was the answer. With such heating we had to constantly monitor the moisture levels of the planking and Alastair did a great job recording and monitoring moisture levels in the hull.
By half way through January, after being in the shed for four months we could now make educated plans on finishing the project and getting Cambria back afloat. We had always hoped to be completed and ready for sea by the end of October, and though there was a mountain of work left to achieve this it was certainly possible and this became our goal. All the work could be categorized into hours, and with good planning to prevent everyone working on top each other, Cambria could get wet at the end of September start of October.
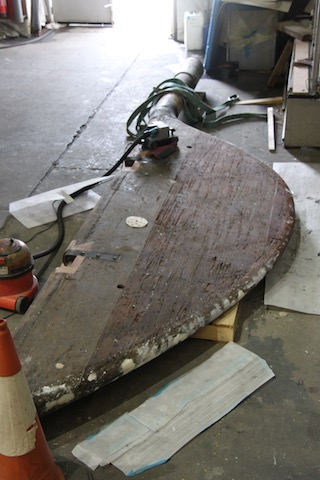
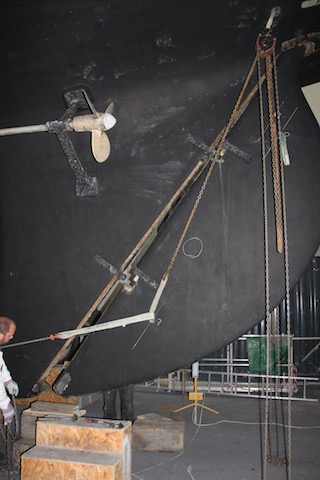
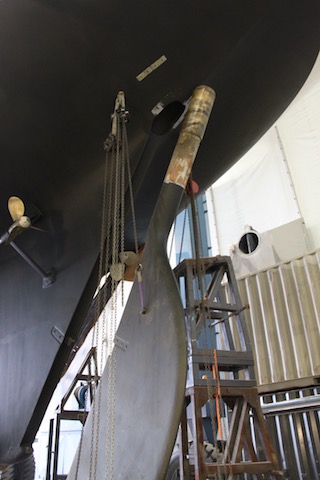
The rudder had come off Cambria on the first day of her arrival in the shed. It had come off easily and as designed. On initial inspection there appeared to be no major issues with it. Once off and all of its fibre glass layer removed, the rudder was hung and supported so as to not induce warping of the timber. The teak rudder stock was in pristine condition whilst the mahogany blade was also remarkably well preserved. The only part requiring attention was a mahogany Dutchman under the uppermost pintle which, at some stage during Cambria’s stay in more tropical regions, had been mostly consumed by a very hungry Doredo worm! This section was duly cut out and replaced with teak. To remove this section it was necessary to remove the band incorporating the pintle, which was traditionally copper riveted onto the rudder. Since it had to be removed it was worthwhile checking the state of the rivets to ascertain any corrosion in the region. The copper rivets had to be drilled and punched out. The copper itself was in excellent condition, and the same method of annealing the copper was used to reinstate the strap once repairs were complete. The rudder was our test piece for re-glassing using the system we would employ on the main hull.
How to remove 1928 Fife rudder. As none of us had been involved the last time Cambria’s rudder came off, this would be a learning curve. We all hoped it would simply come off in the traditional manor. This is exactly what happened. The sacrificial wood chocks to allow the lifting of the rudder off its pintles were removed. We had removed all internal steering gear – quadrant, pins, prior to coming out of the water. Leaving the rudder trunk to unbolt once ready to lift the rudder. As we did not find any obvious lifting points, Barry drilled off two, estimated in “roughly” the correct position; one near the top pintle and the other near the bottom pintle. We then used 4 chain blocks two either side, one to each lifting point. Using two further chain blocks to hold forward in line. Hold rudder trunk in position and remove bolts. Once plate free, lift on chain blocks then ease away until clear of sternpost aperture. Fortunately the cockpit drain skin fitting through holes are in just the correct line of pull, so using lifting strops over the stern post to connect the chain blocks to, we had everything in place. It is very important that the rudder trunk is free to move to allow the rudder to lift off its gudgeons. Once the head of the rudderstock was clear of the aperture, it swung clear and free. Putting the rudder back in was the reverse of this process though we did need to use a chain bock inside to locate the rudder trunk back over its boltholes.
Whilst moving through the interior preparing steel work we found corrosion about the port chain plate. Upon further investigation we found the whole chain plate arrangement requiring attention as packing plates had been used and corrosion had got between the layers. The web frames to which the chain plates are bolted are 12.5mm steel, the chain plates were designed with a 20mm shoulder, hence the additional packing piece to fill the gap. To rectify this we cut out the web frame by way of the chain plate, welding a 20mm section in. The welders did a fantastic job as the measurements were critical so as to not change angles or position of the chain plates, which set the cap shrouds.
This method of preparing the hull's interior for painting was the best for locating all the questionable steel and timber. By removing rust and old paint we methodically worked our way from forward to aft. This also allowed us to treat the frames under the fastening nuts ready for the isolation washers and revitalized bolts. This approach paved the way for the team replacing the fastening allowing the correct order for everything going back together.
By the end of February, the steel work forward of bay 13 and the mast step was complete. This was a milestone as it allowed the stem to go back on. With the stem and forefoot back together we could start planking up the bow. This was clearly where we needed to speed up proceeding so with the help of an old friend Ashley and his company of skilled shipwrights, Ashley Butler and Co. we made plans for some extra help to come in for a short but intense time to help with planking and caulking of the bow. Ashley and his team share the passion of wooden boat works and their work was exemplary. The guys (Kevin, Ashley, Giles and later T2 John) moved up from Devon and Cornwall, living on another friend, and delivery crew, Olly Graffy’s classic gentleman’s launch, Silver Crescent. Which was conveniently berthed in Saxon Wharf.

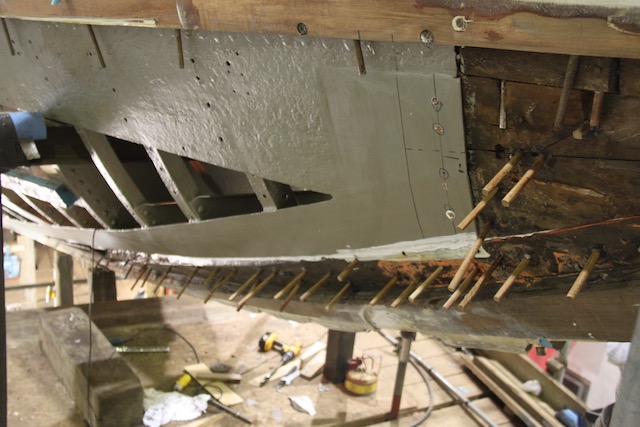
The stem was bedded on and bolted up on the 13th of March, and Ashley’s team arrived the following week for a 5 week stint. The aim was to reinstate all 46-bow planks (23 either side), during this time. Some planks were easier than others, however it still worked out at around a plank per day fitted. These planks then needed calking, and splining, it was an immense mission. To achieve this the preparation (painting of steel work, dowling of old fastening holes in the stem/forefoot and painting of landing surfaces)had to be complete to allow the planker a clean run. There was a stage where Cambria’s bow resembled a hedgehog rather than a 23m Fife! We had areas along the stem and forefoot where the keel plate angle had been removed and replaced, however, due to the replacement section being welded we had voids where the rivets had been originally. These voids were filled with teak dutchmen to ensure there were no areas for moisture to accumulate and start the rust process again. These were all epoxied into place and faired in ready to accept the planks over the top. The steel work had to be treated and then received 3 coats of Interprotect epoxy primer. At the temperatures we were working we needed 7 hrs between coats so we needed 2 days before we could start hanging planks on the painted frames. It was very important to stay on top of the prep so as not to slow the plankers down. The planks themselves needed two coats of primer (we used Epifanes Multi marine primer) before fastening. This ensured a good layer of protection between the plank and frame surface, which cannot be treated once closed. When the plank was ready for fitting, Arbokol 1000 was also applied as a bedding compound to the back of the plank. The plank fastenings were fitted with both Arbokol and boat cotton grommets. Another dab of Arbo went under the landing face of the tufnol isolating washers. This protocol was followed throughout in the endeavor to provide maximum water resistance and galvanic isolation.
Our stock of teak and mahogany was carried over into the Ably shed and laid out to start finding all the planks required. All boards were carefully inspected so as to get the most out of each. With the plan still to replace below water planks with teak, keeping the mahogany above the waterline. We put together a list of planks to be repaired and replaced. This list was ever evolving, as the planks went back on, we could up date our list and reassess our stock.
Repairs varied from small graving pieces about the fastenings to plank ends being removed and new sections scarfed on. All repaired planks were re-edged.
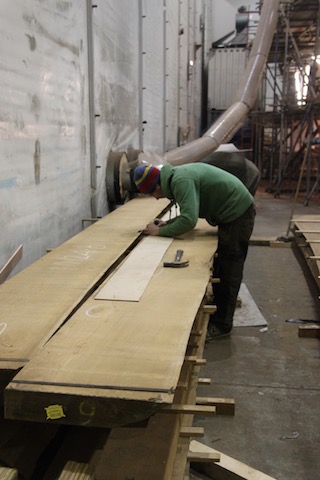
Nb – even though the list continued to evolve through the project we did have enough stock in the end with one teak board remaining and ¾ of a mahogany board. One of the most impressive facts was that not one plank was broken during reinstating. This tells the quality of the timber and the skill of the shipwrights. Many of these planks were in tight places, which not only incorporated bend, but twist as well. Areas around the sternpost were full of shape. None of the planks were steamed; they were gently (!!) coaxed into position with wedges and clamps sometimes over a couple of days before a large persuader was used to drive them home.
Though March had started positively we suffered a number of staffing set backs losing one of our plankers, Kevin, to epoxy intolerance, Chuck back to NZ with other work commitments and John Garret down with Pneumonia. Epoxy intolerance can happen to anybody at any time, and everyone has different reactions to it. Though Kevin had worked with epoxy many times and used the PPE, he had reached his limit. When this happens you cannot be around epoxy without breaking out in a rash. Sadly for Kevin, and us he had to leave the project and we were again short numbers. Johnny who had been with us since day one was also a major loss at this time and we could only wish him a speedy recovery. SYS and Centerline both did their best to supplement shipwrights but there is not an endless supply, particularly at this time of year when the marine industry is flat out getting all projects ready for the season fast approaching. It meant longer hours for all to keep pushing for the goal of October launch. Here again SYS came to help by allowing us to work on planking often until 2000hrs in the evening. It was always important to finish the day with and gluing projects so that they would be ready for installation or shaping the next day.
We used 5 inch by half inch silicone bronze coach screws to refasten planks into the teak stem and forefoot. These needed to be greased before driving in on pneumatic drills, they were also set with bronze washer and Arbo. Where the lower planks fastened up through the steel keel plate we used 8 inch A4 stainless 12mm bolts. As these arrived through the keel plate on an often acute angle, customized bronze wedge shaped washers were made to provide the tufnol washers with a flat, square to bolt shaft land.
The end of March also saw the rudder glassed and painted. The process had gone smoothly, and a few lessons were learnt for the next project of glassing the hull. The main point being not to try and hang too many layers to minimize the creep of the cloth with the weight of the glass/glue mix. The Rudder looked fantastic, and though we still needed to reinstate the upper pintal, it was magic to see a completed piece of Cambria. The rudder, which lived (hung) at the bottom of the stairs leading up to the scaffold of Cambria, served as inspiration for me for the remainder of the project. It would be the last piece to go on before leaving the shed and it was now ready! It was a thing of beauty and a joy forever!
April is often one of the best months to visit the UK. The weather finally breaks up and the sun generally shows itself again after a long winter sleep. April was a very busy month with the bow being completed. The majority of the welding work was also completed with both John and Dave finishing up leaving only one welder, Bob on site. Bob would continue completing all the smaller jobs. The team in the strip club, Anna, Colin and Laura had finished stripping and were now building up coats of varnish. The temperature had climbed sufficiently to also enable the mast to be coated with D1, to finally finish that project. Adam was busily making repairs to the deck furniture so it could be varnished; even the shed door was opened to let the sun in. Tom joined the strip team now on the deck of Cambria stripping and coating up the hatches and coamings that had been left on board.
Dave took to helping Bob with the steel work, and after a quick lesson in bending steel plate, he was soon fabricating butt plates for the plankers. These are the steel plates which are used for joining plank ends between frames.
The culmination of a busy planking period saw the ‘goal posts’ removed. These had supported the bow whilst the structural work in the area was carried out. With the bow planking complete, Cambria’s forward structure had returned to Lloyds 18A level. With the ‘goal posts’ out the bow could be completely closed up. This occurred on the 1st of May and by the 8th of May shutter planks were installed both sides. With all planks complete from mast forward we could reallocate tasks setting up teams for caulking and splining to follow the fastening and plugging teams. Moving shipwrights John Bray and Sam Fletcher aft to finish planking over recently completed steel works by way of the sternpost and horn timber. As these teams moved aft it cleared the way for the hull to be faired using power planners.
The splines and plugs were made from like for like timber, and the splines were beveled to fit in over the caulking and follow the bevel of the plank. Each spline was 1inch deep and tapered from 5/16inch to follow the plank-caulking bevel. The caulking was 8-strand boat cotton. Prior to caulking all seams were raked by hand to 1-inch depth and ¼ inch bevel. Once the splines had gone off the excess was planed off allowing for the hull to be sanded. With splines and plugs another milestone was met as we could now continue with the interior paint job. Steel work and inside faces of planking all received 3 coats of primer followed by 3 coats of Damboline. Between second and third coats of damboline, painters mate and Arbokool 1000 were applied to any water trap areas, hence should any water land on the surface or collect from condensation, it can freely run into the bilge.
Johnny Garret returned at the end of May after 3 months off with pneumonia coinciding with Ashley and his planking team finishing and moving on to their next project. It was great working with Ashley, Kevin, Giles and John; a brilliant team of skilled and motivated traditional shipwrights who I have the utmost respect for.
With Johnny back on light duties, he and Alex took on completing the isolating of fastenings task.
As the painting progressed through the interior we could start to plan the next stage of the refit. The crew mess, forward of the engine room had always been a tight space with minimal storage and a dramatic sloping floor following the line of the forefoot. This was the result of the ‘95 refit, which had foreseen Cambria used as a day sailer/racer. Fife had originally designed and built a stepped crew mess with footlockers for storage. Long time Cambria Naval Architect, Theo Rye, an expert on Fife designs, supplied drawings to get the project started. SYS joiner, Rob Henderson would start on the crew mess rodding out the drawings as soon as the paint was dry.
June 16th saw the last of the planks repaired and reinstated. A week later the first peel ply went on in readiness to start glassing the hull. Peel ply is a fantastic cloth which is put over the sealing coat of epoxy (Ampreg 21) which not only removes amine blush but also keeps the surface prepared and ready to glass over. Glass started the following day and a routine was soon established. The glassing procedure consisted of laying 4 cloths of glass fibre: firstly a biaxial cloth, then two 0-90 cloths followed finally by another biaxial cloth. Each cloth was 600grm and was staggered in the lay up to ensure a continuous bond. This left Cambria with a similar skin as she had from ’95, approximately 3.0mm. once each section received it’s 4 layers this finished area was again peel plyed and left to cure. Again using peel ply to minimize preparation, as the surface under the peel is ready for painting.
Interior painting works had progressed so well that the interior was starting to be reinstated. Colin and Laura were now sifting through our stores to bring over each cabin, as it was required. Tim was working on reinstating the galley; Paul was busy rebuilding starboard/captain/port cabins while Rob was still working the crew mess out.
Andy Carter our engineer had been quietly working away all winter. He was in charge of all the engineering ensuring it was ready to be reinstated when the time came. This meant cleaning, painting, servicing and making improvements where required to all of Cambria’s systems. As the engineering refit had been completed 5 years previous the aim had been to remove, label and store Cambria’s systems so they could be readily bolted back in. Nothing could happen until all remedial hull work was completed and painting was finished. As areas throughout Cambria were finished Andy could come in and lay cable runs and prepare wire looms ready to be covered by joinery. The 1st of July saw the tanks go back in the main bilge: three fuel tanks, one water tank and one grey/black tank. With these strapped back in place, it marked the start of the system reinstallation. Steve and John, from SYS, soon joined Andy and the three of them set to the massive job in front of them. The tanks provide the borders for all plumbing, hydraulic and fuel pipe work. We had had noise issues from the hydraulics from the last refit and used this time to rectify them. We changed mounts, increased and added further insulation. Time would tell. By the end of July Andy and his team had the wiring looms aft of the new crew mess completed and also the hydraulic pipe works and fuel lines in place. There was still a mountain in front of us but goals were being achieved, and with each task completed the next could be commenced.
The 3rd of July marked the end of an era on Cambria, Natasha (Tash) Whiteford, our chef for nearly 10 years to the day finally called it a day. Whether calm seas or storms, 40 people or 4, Tash produced amazing meals out of a difficult space. Tash moved on to her next challenge, that of raising a family. We wish her all the very best.
Bob the welder was finishing the last of the steel works including welding in a new mast collar and a repair to the owners cabin forward compression post. Cambria has 7 compression posts along her centerline. Of these we found one with rust issues to be cut out and repaired. As usual such a task is not so straight forward. It is important to ensure the post is completely supported and maintains its position whilst repairs are made. By welding in a temporary 'C' clamp enabled this be completed. Bob finished full time on the 10th of July which meant we had free run with the interior painting program through the master cabin and the lazerette.
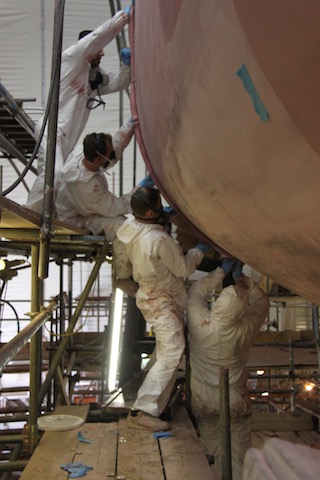
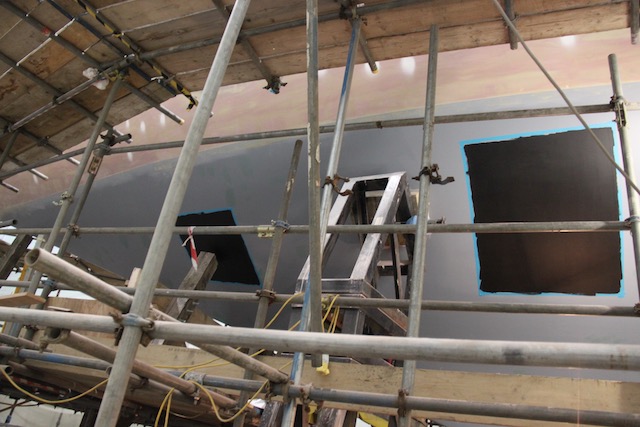
Mike and his Centerline team were getting into a rhythm. They would now start working their way aft and by the 21st of July we were able to peel the peel ply and paint the bow section with two coats of Awlgrip Hullguard Epoxy primer. This would provide the surface for the fairing compound and start the painting system of the hulls exterior surface.
Cambria’s paint system: Hullguard, LW fairing compound (Pink), below water; spot fill with interfill 833, 4 coats interprotect, antifoul, above water; awlfair surfacing filler (to 300mm below waterline), 3 coats 545, 2 top coats Awlgrip.
Cambria was now like a rolling factory line, we were chasing each other’s work from bow to stern. After each section was planed and sanded, it was then; sheathed, painted and faired. Once the whole hull was faired with the pink Awlfair, we could then start the hull painting.
And as we had time, we started the last new project scheduled for Cambria; to make repairs and remedial work to the cockpit. Cambria’s cockpit seating had been renewed in ’95 with an increased angle on her original deck camber. This had been achieved by wedging up the cockpit seat, creating a void between it and the original deck. This had caused numerous problems over the years with water being trapped within this void. The aim was to remove this void by removing the old teak seating which had also been laid square to the center-line. The new seating would be laid to follow the sweeping deck. Upon removal, the starboard aft quarter of the cockpit needed repairs to the sub deck where water had penetrated the teak, ply and into the original pine deck. The steel deck beams were all in good order.
Our next milestone was the 4th of August when the last coat of Damboline went on the lazarette. The interior paintwork was now complete! This freed up our crew again to help out where required on other projects which was particularly useful as the yard hit the summer holiday period and members of the team took off on well deserved holidays.
Two of our crew, Colin and Adam, joined a team of three from ‘Superyacht Solutions’ (a yacht fairing and painting company) lead by another Cornishmen EJ. The five of them started to chase Mike and his team applying the glass.
As each area of the hull was finished we could move the poppet supports to work on those small sections of the hull untouched since she was blocked in the shed. Each of these moves was well planned and organized so as to not place any unsupported stress on the new works. Each poppet was moved onto a section next to its original place which was even antifouled, ready to go back in the water! This generally left an area approximately 1.5m square which needed refastening, re-caulking, re-splining, sanding, fairing and the full paint system applied.
The glassing team finished on the 3rd of September and the fairing team finished on the 7th. Though milestones in their own right, these two jobs completely buried Cambria’s beautiful planking. Though a major moment in completing the refit, it was sad see the beauty of these lines disappear.
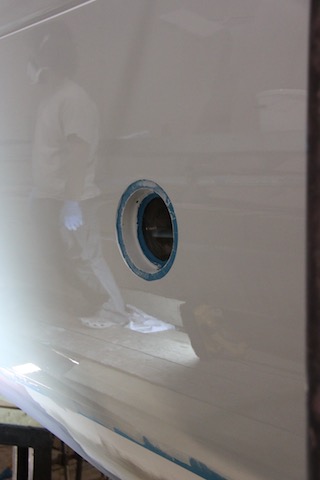
With the completion of these tasks the teams were split and allocated new jobs. The reinstatement of the bowsprit, deck cover board repairs by way of the stanchion bases, deck prism repairs, porthole reinstatement, carving the dragon on the bow, routering in the cove stripe (cavita line) and new through holes for skin fitting and their backing plates.
The deck repairs were generally around the stanchion bases and the chain plate through deck joint, where over the years, water ingress occurred and pooled. Water was trapped under the original cover boards (Mahogany?) and the steel cover plate. The damage was local and could be chased to an end point because of Cambria’s sheer line the damage occurred at the lowest point. The rotten timber was removed, the steel treated and painted, a packing piece reinstated and finally a new teak covering board.
The fairing team was certainly happy to see the back of the 5m long fairing boards (PVC pipe with 60 grit sand paper stuck to it). They had completed a grueling task, but the finished result was spectacular. The paint job is always only as good as the fairing. With the hull fair it was now just a fine scree of surface filler to remove sanding scratches and pin holes. The first coat of 545 primer went on the 18th of September.
Rob Henderson, who had now finished the crew mess, came back on board to carve the Fife dragons on the bows. Rob had previously carved a number of Fife dragons, including Tuiga’s and did a magic job for Cambria. With Rob finished, and the bowsprit in place, the dolphin striker and head gear (whiskers and bobstay) could be re installed. The whiskers had been a source of water ingress. To solve this a custom made through-hull fitting was made. This would stop any chance of water again getting trapped between sheer plate and planking. The bobstay also has its own custom fitting where it passes through the hull as it is fastened via a bottle screw to a lug on the centerline under the crew mess. The bobstay passes through the hull on the waterline, so must be well sealed. The inboard end of the bobstay had been one of the rod ends found needing re-ending. Ocean Yacht Services carried this out. They also re-headed our V1’s to accept two new C550 turnbuckles as the internal thread of the originals had bound in removal. As always the challenge was in the logistics, getting two 12m long 25mm diameter rods through Southampton city to OYS located the other side of the New Forest in Bournemouth. We had previously borrowed the Rig Shop’s trailer but unfortunately Harry was busy, so the team from Allspars at Swanick stepped in and leant us theirs. OYS were great to work with, and with the uncertainty of Navtec, they provide an excellent alternative.
During this period, the end of September, all jobs were running to their end. The prop-shafts went back in on the 23rd two days before the first topcoat went on.
The port shaft log had been realigned back in the 08/09 refit. This time with the works to frame 43, the starboard shaft log was realigned. In 1987 when the Hydraulic drive had been fitted, frame 43 was cut to allow the shaft to line with the new hydraulic motor. This had always been a weak area, and though bridged remotely, the frame had decayed in-situ. This area was cut out and replaced back in April with a bridge over the shaft tying the frame together. Both shafts slid in effortlessly. The plank encasing the starboard shaft log had been replaced so a new shaft hole had to be drilled off. Barry set up a piano wire from the center of the starboard P bracket; to the center of the Starboard thrust bearing. This gave the correct angle to drill the new plank off. Once a pilot hole was gained, the remainder of the shaft ellipse could be shaped out. The end result had the alignment to within a millimeter. When first installed in ’87 the shafts had been drilled off to the center of the planks which is great for the structure of the plank about the shaft, however the design of the bronze shaft logs themselves placed the bolts for securing them to the hull coinciding with the seams of the plank, not ideal. To correct this we put in stealer planks, offset at the shaft log, this gave the fastenings of the stern log full width timber to attach to.
The batteries went back in, chargers, inverters and the electrical panels were ready to run up. Another credit to Andy who reconnected both AC and DC panels, a myriad of wires, some of which did not necessarily coincide with their labeled numbers.
All of the deck fittings, which had been sent off for re-chroming months earlier, were being refitted and deck furniture, which was now beautifully varnished, was also being re-bedded. There is always a rewarding feeling fitting the shiny pieces!
Friday the 25th , after the yard team had left, was our first top coat day. The 545 primer had been sanded back with 280 grit, the waterline taped on, and the shed cleaned in readiness. Two three-person teams took two hours to complete the first coat; one tack ragging and spotting, one rolling and one tipping. Saturday we sanded with 320 grit and then Sunday we applied the final coat.
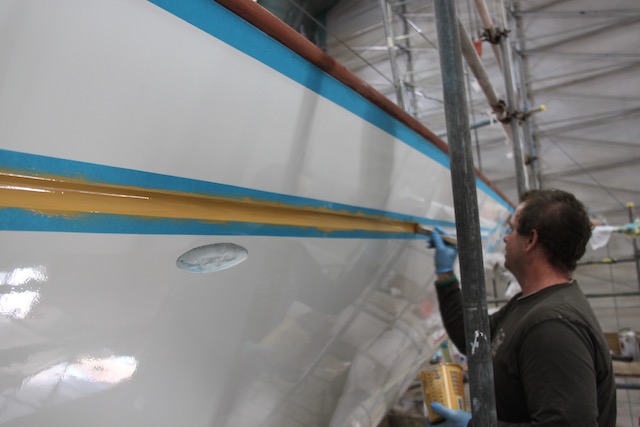
During the last week of September the doghouse was reinstated, the gold cove strip and the dragons were base gold painted ready for gilding and further coats of varnish were applied to the cap rail. Two coats of antifoul (International micron 99) were applied and the scaffold was taken down.
The topcoat needed to fully cure before we could put her in the slings of the travel lift. Launch would be on Thursday the 8th of October with the weather and tide looking favorable. We took the mast and boom out on the 5th and barged them back to Bladerunners, ready for dressing.
The front of the Ably shed, Cambria’s home for the last 13months, was removed on the 7th and the travel lift moved in. The last of the tasks was to hang the rudder back on. Using the travel lift to lift Cambria a further 1.5m to swing the stock in. The process was reverse of taking the rudder out. The most difficult part was to line up the bolt holes on the rudder head plate once the rudder was sat on it’s pintles and heel plate. The rudder head plate is fixed to the stern post and houses the rudder stock where it passes through the hull. The hole in the sternpost is an elipse shape to allow aligning of the rudder, the housing is round like the stock so as to provide a water tight seal. The only barrier is grease and wadding. Using chainblocks to manipulate the plate/housing the bolts dropped in. The plate/housing is bedded down with Arbokol. With the rudder trunk realigned all the steering gear could be attached, the quadrant and gearing was reassembled. Cambria was ready to go back in.
Manipulation of the rudder had taken longer than planned, however, there was still enough water to launch, just! Just on midday, Cambria went back into the Itchen River.
.jpg)

Hydraulics and systems were all run up on the following Monday and we stepped the mast on the 14th. The navigation gear was re-commissioned on the 19th and we set off on her first sea trial on the 20th. It was a gentle day out, 8 – 10 knots of breeze. Cambria had a magic sail and it was great to feel the water passing under her keel again. There were naturally some issues, the main being the port thrust bearing running high temperatures. However, considering the scope of work undertaken, for this to be the only major snagging point is a credit to all involved. Other than her general feel being much stiffer through the hull, the other major difference was the reduction in hydraulic noise below deck. A fantastic result.
We then spent the next four weeks waiting on a weather window to get us out of the English channel and on our way south. We spent the time cleaning out the “strip club”, loading a van of all gear to head back to Cannes, cleaning crew houses and catching up on interior details.
It was during this time that Andy Carter’s tenure with us came to an end. After 7 years on and off with us, Andy was planning to move ashore and set up his own business. Andy has been a great asset to Cambria over the years and we all wish him the very best for the future.
It was incessant; SW’ly day after day, week after week. We were eventually presented a three-day window on the 20th of November. So 15mths after arriving in the Solent, we set sail for Cannes, France.
The trip south was excellent. We had strong Northerlies all the way to Cape Vincente, Portugal. The weather then switched off and we had sunshine and calms from Gibraltar all the way back to Cannes, even landing a tuna off the Balearics. We were twelve days including two very fast fuel stops in Cascais and Palma.
Our time in the UK was a blur. Though planned, organized and well supported, it was incredibly busy. Everyone involved will have their own mixed emotions regarding the project. Generally, it was an incredibly positive, once in a lifetime experience. Sharing this time with like-minded people, all focused on the same goal of faithfully and sympathetically restoring one of the most beautiful yachts afloat, is very special. Old friendships have been strengthened and new ones formed. The common denominator is Cambria.
Special thanks:
To the Owner of Cambria, for without his dedication and love for his yacht, none of this could happen.
To the Cambria refit crew: Anna, Dave, Tash, Andy, Colin, Laura, Adam, Chuck, Tom and Will.
To the SYS crew: Barry, Garry, Alex, Jim, Adam, Sam, Matt, Rob, Steve, John, Tim, Ali, Matthew and Paul.
To the Ashley Butler and Co. team: Ashley, John, Giles and Kevin.
To the Centerline team: Mike, Pete, Johnny, Alex and Jamie.
To everyone else who helped through the project from the stores in the yard to the extra help in numbers when needed and the people behind the scenes at the end of a phone helping out with all the millions of questions all needing answers.
Finally, thanks to Theo Rye who sadly and tragically passed away in Nov 2016. Theo’s work is throughout Cambria, from his initial reports on her during the ’95 refit in Australia to the detail of the master cabin, Navigation station and crew mess refurbishments. Theo was our silent (!) extra crewmember, always available at any time on the phone ready with answers, real or made up, to all questions. Theo was the most respected classic yacht/Fife historian naval architect certainly that I know. He spent hundreds of hours with us during the refit. Consulting, chatting or eating, Theo was well known about the yard, he easily slipped from talking banter with the shipwrights to discussing shear loads of bolted chain plates. His loss is a major loss to us, though we are lucky to have spent as much time as we did with him and his legacy remains floating in the 135 ft Fife Cambria.